|
Diary of a Barn Quilt Artist.
Installing can be done with two people and a ladder when the BQ is hung and ground level or 6 feet above. For those hung at a higher distance, a bucket truck or scaffolding is recommended.
See our short video and instructions below. |
|
The Making of a Barn Quilt Sampler.
By Laurie Searle (April 12, 2022)
|
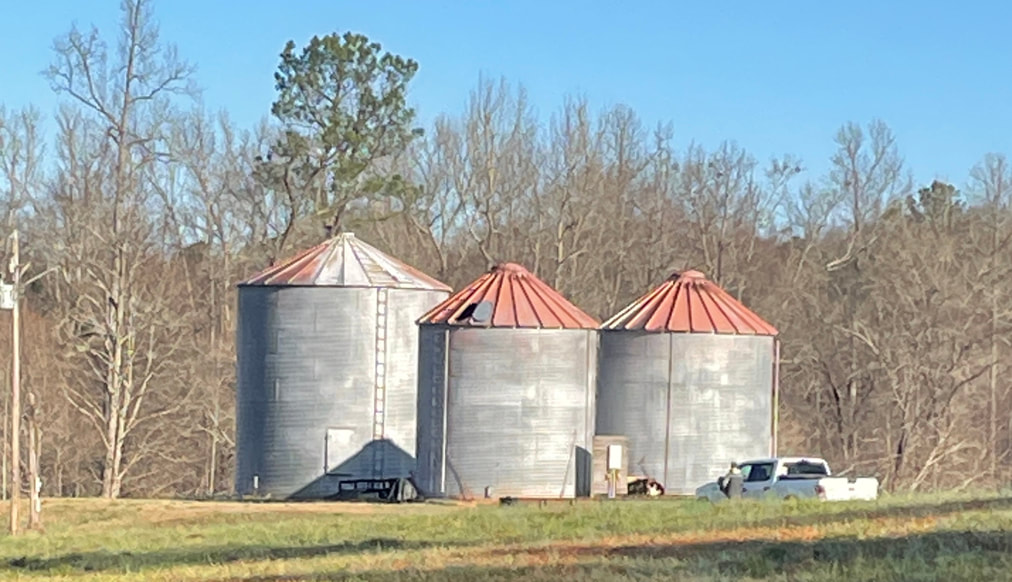
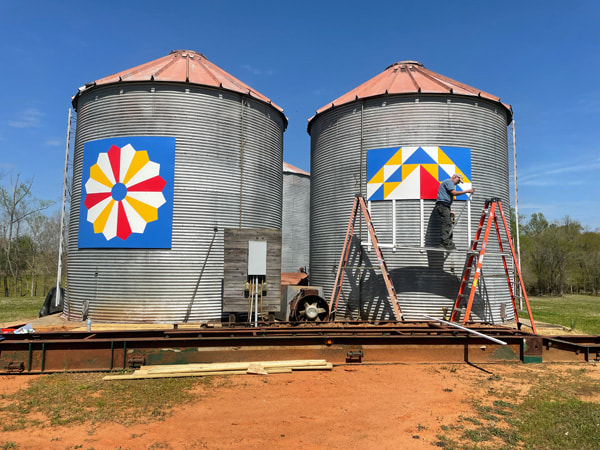
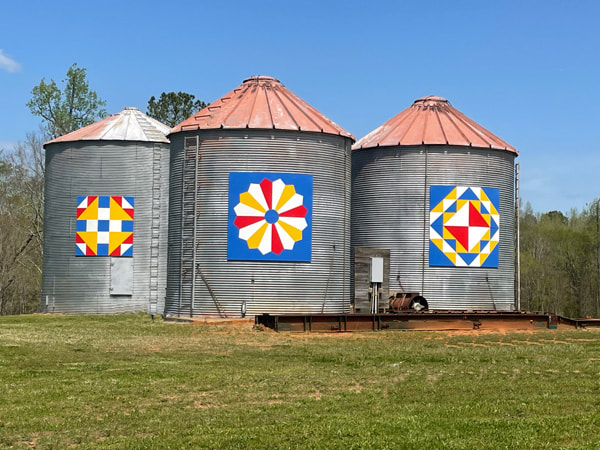
I've had my eyes on these three silos in our community ever since I started our Chatt Hills Barn Quilt Trail a few years ago. I had only seen one other barn quilt silo and that was on the Alabama Barn Quilt Trail -- and I loved it! I mean, yeah, barns are supposed to be the star of barn quilt trails, but there is something so rural, so farm-like, of old grain silos. And to have three silos in our community sitting side-by-side --- the thought of adding barn quilts was exciting.
|
|
By the time February 2022 rolled around, I finally felt like I had enough barn-quilt skills to tackle this project, so I asked the new property owner if he'd like his Three Silos Farm on our barn quilt trail and he said yes!
While obtaining permission was the first step, there was actually a more important step to be taken before seriously considering this project -- asking my hubby if he would be able to install barn quilts on the silos. He has installed a few barn quilts on this tough corrugated steel before and it was a bit of a challenge (more about that later). Another challenge with this project would be hanging the barn quilts on these tall structures. |
SITE VISIT
We did a site visit and measured the silos. That was easy enough to do since each horizontal band of corrugated steel measured 32 inches. And so we estimated the two smaller silos were 18 ft tall and the third taller silo was 24 feet.
Next we did the 8ft board test. That's where we position an 8ft board to determine the approximate placement of the barn quilts. This also gives me a photo I can use for a mock-up, so I can scale the images of the barn quilt to 8 ft and Photoshop them in the photo to give the property owner an idea of how it will look.
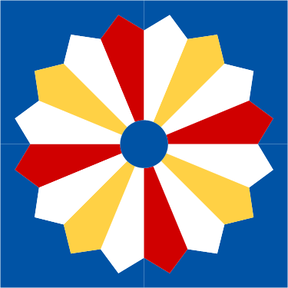
SELECTING THE BARN QUILT PATTERN
Selecting the pattern and colors is often a part of the project that isn't discussed much among barn quilt artists. Those who have been doing this for a long time make it seem "easy peasy" but for many of us, it's a struggle to find a pattern that is somehow significant to the barn quilt host. We also must find a pattern that is within our skill range to draft it, sketch it on the board, and paint it. And finally, the pattern must be appropriate for the viewing distance -- the farther away from the road, the more simple the pattern needs to be, else all of the details will be lost from view.
I selected six patterns that met the above criteria, then asked my hubby for advice picking the colors. He's a big fan of using primary colors, since they have a lot of contrast and can be seen easily from the road. I used the "Electric Quilt" software program to find these patterns and color them in blue, yellow, red and white. This program also lets you print the pattern without the colors so you can see the lines of the pattern, which makes it easier to sketch.
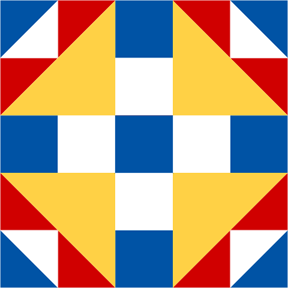
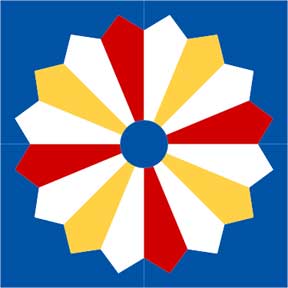
Then I contacted four of my favorite barn quilt artists (who have a combined total of 100 years of experience between them) and asked them to select their favorites. The majority picked the same three patters from left to right below: Duck & Ducklings, Dresden Plate, and Corn & Beans.
Selecting the pattern and colors is often a part of the project that isn't discussed much among barn quilt artists. Those who have been doing this for a long time make it seem "easy peasy" but for many of us, it's a struggle to find a pattern that is somehow significant to the barn quilt host. We also must find a pattern that is within our skill range to draft it, sketch it on the board, and paint it. And finally, the pattern must be appropriate for the viewing distance -- the farther away from the road, the more simple the pattern needs to be, else all of the details will be lost from view.
I selected six patterns that met the above criteria, then asked my hubby for advice picking the colors. He's a big fan of using primary colors, since they have a lot of contrast and can be seen easily from the road. I used the "Electric Quilt" software program to find these patterns and color them in blue, yellow, red and white. This program also lets you print the pattern without the colors so you can see the lines of the pattern, which makes it easier to sketch.
Then I contacted four of my favorite barn quilt artists (who have a combined total of 100 years of experience between them) and asked them to select their favorites. The majority picked the same three patters from left to right below: Duck & Ducklings, Dresden Plate, and Corn & Beans.
|
|
|

|
SUPPLIES
Each barn quilt measured 8x8 ft and was made with two (pre-primed) 4x8 ft Aluminum Composite Boards -- light-weight sheets of material used by sign painters. I started using this material from the very start of our barn quilt trail based on the recommendations of my buddies and mentors on the Alabama Barn Quilt Trail. They said other barn quilt trails reported that plywood, which was the original material used in early barn quilt trail days, tends to deteriorate over time and is also very heavy and difficult to install. They have used the Aluminum Composite Boards and had good results.
For paint I used Valspar Durmax Exterior Semi-Gloss, which does not require a top coat sealer. Early on I had used Behr exterior paint from Home Depot, but found that too many of its colors lift off when using painters tape to outline areas being painted.
My only other supplies were a dozen 3 inch rollers (rollers tend to work better on this material than brushes) and tons and tons of Yellow Frog Tape (a painters tape used to section off each part of the pattern as it is painted.)
|
PAINTING THE BARN QUILTS
I started with the most challenging pattern -- the Dresden Plate. Since this requires a compass or other tricks to sketch this pattern on the board, I saved the image as a PDF file and printed it to 8x8 ft using the scaling and tiling feature of my inkjet printer. But then a better idea came to mind -- ask my hubby for help. He is a math wizard and master woodworker so it was no problem for him to draw this patter with a compass. But the challenge was the sheer size and the fact that the patter was split since we were using two 4x8 ft boards. The first time wasn't a "go" but that's why God made erasers, so we tried again and got it right. Painting this patter was fairly easy but then there was the problem of what to do with it when I was finished. While I have a fairly large studio, thanks again to my hubby who built it for me, it isn't large enough to house three 8x8 barn quilts at one time. No worries. As I finished each one I moved it into the garage, leaning it against a wall and protecting it with foam Yoga mats (I knew they would come in handy some day:-) |
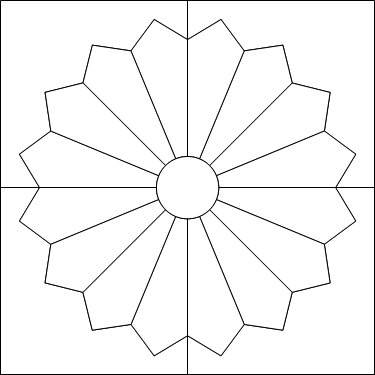
The Dresden Plate Pattern in the Electric Quilt software program lets you color the pattern or print the line drawing.
|
|
INSTALLING THE BARN QUILTS
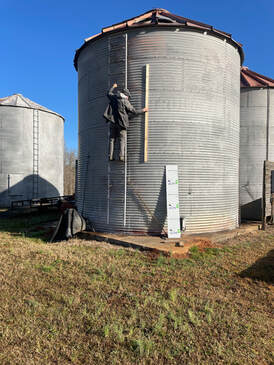
We pondered how to place the barn quilts on the tall silos, keeping in mind there would just be the two of us -- two slightly used, well-worn, young senior citizens. We had previously used our local EMC and their bucket truck, but since this install was a bit tricky, we nixed that idea. Next we thought about renting scaffolding. But the idea of setting it up, taking it down, and moving it three times wore us out just thinking about it. Then I came up with the idea of renting a scissor lift, a platform that can be lifted in the air and easily positioned since it's on wheels. That seemed a perfect solution. When we went to pick up the rental until, an alarm should have gone off in our heads when the employee had some problems getting it on the trailer. Apparently the scissor lift must be perfectly level or it doesn't work. We took the scissor lift to the silo farm and attempted to set it up, but after spending hours of frustration getting it positioned and leveled, we determined it just wouldn't work. We later learned there was a different type of scissors lift for outdoor terrain which might have worked for us, but most probably wouldn't fit in the narrow ground space in front of one silo. So we fell back to our existing practice of using two tall ladders and a plank between them. This meant that we had to install the barn quilts a bit lower than we had initially planned, but they actually looked more centered at that level. We had also pondered on the best way to affix the barn quilts to the silos. Our buddies on the Alabama Barn Quilt Trail suggested we hang them horizontally, so they would bend better, and that we just screw them directly into the silo with metal roofing screws. That was our plan, but the bolts that were used to hold the silo sheets together stuck out too far, so we opted to screw furring strips into the silos and then the barn quilts into the furring strips. We we careful to use the rubber gaskets with the screws so no water would get inside of the silo. While my hubby installed the furring strips, I stayed on the ground to hand up the supplies he needed. To make sure I didn't get injured if something fell from above, I wore my bicycle helmet. I then handed up the first 4x8 barn quilt to my hubby on the platform above. That was a bit tricky and funny. Since these barn quilts are so light-weight and bendy, when the wind kicked up they acted like sails. We didn't help much since we're both a little light-weight. My hubby installed the top horizontal sheet, taking care to level it as he went along. Then he installed the bottom sheet, also taking care to match up the physical seams and pattern. But one thing we noticed along the way --silos are not level -- No way, No how. It might have something to do with their round shape or maybe they are intentionally tapered. Whatever the deal was, it took a bit of finessing to get these installed. A HAPPY ENDING We started on a Monday, and after spending half-a-day with the scissor lift miss-step, we were on a roll and finished installing the last of the three barn quilts on Tuesday by noon. We loved them, but more importantly, the property owner loved them too! Can't wait for others to see the Three Silos Farm barn quilts on our Chatt Hills Barn Quilt Trail. |
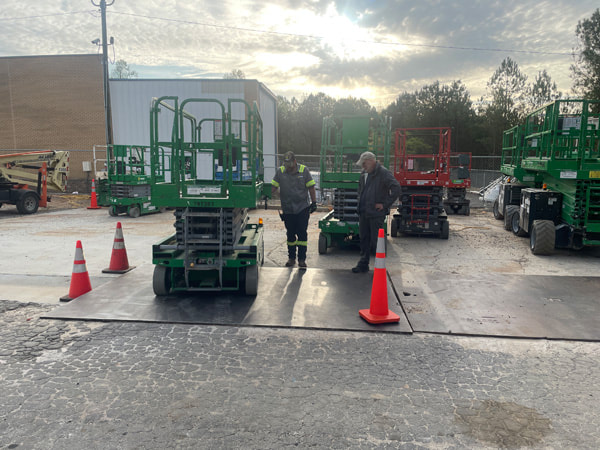
We attempted to use a scissor lift, but it wasn't the right tool for this job.
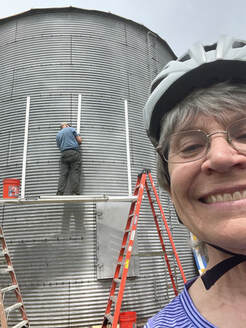
My hubby installed furring strips using two ladders and a platform. I wore my bike helmet while handing him supplies.
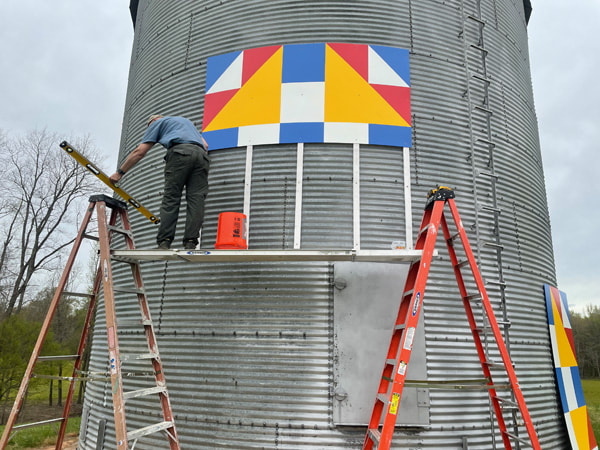
Each 4x8 ft sheet was installed horizontally. Aluminum Composite Panels are very light-weight and bendy so they easily bent to the shape of the silo.

Matching up the 2nd 4x8 sheet was a bit of a challenge because silos are not level.
We installed the first barn quilt on Monday and finished the other two by Tuesday noon.
|
|
To visit the Three Silos Farm and their Silo Sampler Barn Quilts, see their page on our Chatt Hills Barn Quilt Trail.
|