PREPARATION
If this is your first time creating a barn quilt, you may benefit from attending a barn quilt class or from helping an experienced volunteer create a barn quilt. If you have some experience with painting and craft projects, review the following preparation steps before continuing with the instructions on the following pages.
ASSESS THE STRUCTURE
Before designing the barn quilt, consider the following items regarding the barn or structure:
CHOOSE THE BARN QUILT SIZE
Recommended sizes for barn quilts on the trail are 4’x4’ or 8’x8’. These two sizes work well for both large barns and structures and smaller outbuildings. Additionally, these sizes help us economize the projects, since the sign board we used comes in the standard size of 4’x8’. Requests for other sizes may be approved under special circumstances.
SELECT A QUILT PATTERN
For inspiration in selecting a pattern, the internet is a great resource. Recommended sites are Pinterest and https://www.barnquiltheadquarters.com. Or check your family quilts for a pattern you like. A volunteer from the quilt trail can assist with your choice, and also help “digitize” your pattern so you can view different color combinations.
GATHER MATERIALS
Check the list of materials and suppliers included in this guide. Of particular importance is the quality of the sign board and paint, as they will determine the quality and longevity of the barn quilt.
Traditionally, barn quilts were painted on exterior plywood or MDO, a special coated plywood. However; quilt trail groups have reported that over time those materials have warped and not held the paint as well. Additionally, plywood is very heavy, which makes it difficult to install. As a result, more and more barn quilt trails are using a light weight Aluminum Composite Board instead of plywood. This board has been used by the sign industry for years and is highly recommended for its durability.
For the paint, we recommend Valspar DurMax Exterior Latex (Semi-Gloss) from Lowes. We have also used Behr Ultra Exterior Latex from Home Depot but found that some of the colors stick to the yellow frog tape we use during painting, and so we have switched to Valspar.
PREPARE THE ALUMINUM COMPOSITE SHEET
The recommended Aluminum Composite Sheet comes already primed on both sides. However, we take the extra step to prime it again. If your finished quilt block requires a smaller size than the 4’x8’ sheet, the Alabama Barn Quilt Trail has a video that shows how to cut the composite sheets. See: https://www.youtube.com/watch?v=9EEQVDrJehc&feature=youtu.be
Once your sheet is the desired size, follow these steps:
DRAW THE QUILT BLOCK PATTERN
If this is your first time creating a barn quilt, you may benefit from attending a barn quilt class or from helping an experienced volunteer create a barn quilt. If you have some experience with painting and craft projects, review the following preparation steps before continuing with the instructions on the following pages.
ASSESS THE STRUCTURE
Before designing the barn quilt, consider the following items regarding the barn or structure:
- The available space on the barn or structure. This will determine the finished size of the barn quilt.
- The structure’s exterior covering. Different materials can present challenges that must be addressed prior to attaching the finished block to the barn.
- The height of the point where the block will be attached to the structure. This will determine the number of people and what type of equipment is needed to safely attach the block.
- The structure’s distance from the road. Structures closer to the road can display more complex quilt patterns, while those farther away should use simpler quilt patterns with more contrasting colors to be seen well.
CHOOSE THE BARN QUILT SIZE
Recommended sizes for barn quilts on the trail are 4’x4’ or 8’x8’. These two sizes work well for both large barns and structures and smaller outbuildings. Additionally, these sizes help us economize the projects, since the sign board we used comes in the standard size of 4’x8’. Requests for other sizes may be approved under special circumstances.
SELECT A QUILT PATTERN
For inspiration in selecting a pattern, the internet is a great resource. Recommended sites are Pinterest and https://www.barnquiltheadquarters.com. Or check your family quilts for a pattern you like. A volunteer from the quilt trail can assist with your choice, and also help “digitize” your pattern so you can view different color combinations.
GATHER MATERIALS
Check the list of materials and suppliers included in this guide. Of particular importance is the quality of the sign board and paint, as they will determine the quality and longevity of the barn quilt.
Traditionally, barn quilts were painted on exterior plywood or MDO, a special coated plywood. However; quilt trail groups have reported that over time those materials have warped and not held the paint as well. Additionally, plywood is very heavy, which makes it difficult to install. As a result, more and more barn quilt trails are using a light weight Aluminum Composite Board instead of plywood. This board has been used by the sign industry for years and is highly recommended for its durability.
For the paint, we recommend Valspar DurMax Exterior Latex (Semi-Gloss) from Lowes. We have also used Behr Ultra Exterior Latex from Home Depot but found that some of the colors stick to the yellow frog tape we use during painting, and so we have switched to Valspar.
PREPARE THE ALUMINUM COMPOSITE SHEET
The recommended Aluminum Composite Sheet comes already primed on both sides. However, we take the extra step to prime it again. If your finished quilt block requires a smaller size than the 4’x8’ sheet, the Alabama Barn Quilt Trail has a video that shows how to cut the composite sheets. See: https://www.youtube.com/watch?v=9EEQVDrJehc&feature=youtu.be
Once your sheet is the desired size, follow these steps:
- Remove the protective film from each side slowly and carefully to avoid static build-up.
- Pre-clean the surface with isopropyl alcohol, using non-colored cloth for best results.
- Scuff the surface with a sanding block or sand paper, preferably using a grain size of 360 grit. Do not grind through the coating to the aluminum metal.
- Remove dust with a lint-free cloth moistened with isopropyl alcohol.
- Apply two coats of exterior (water based) primer.
- Apply two coats of the background color.
DRAW THE QUILT BLOCK PATTERN
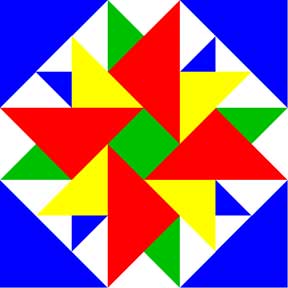
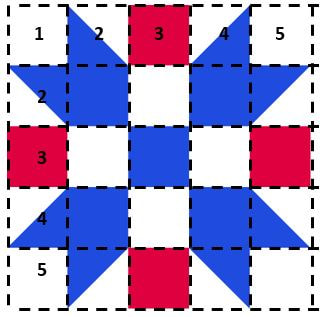
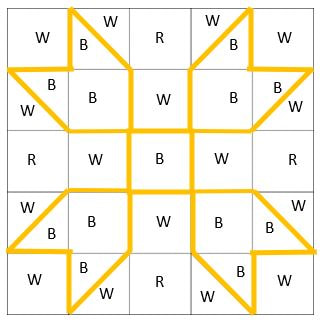
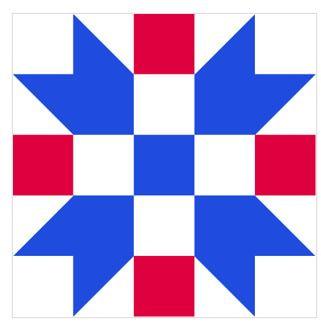
- Print a colored copy of your quilt pattern. (Figure 1)
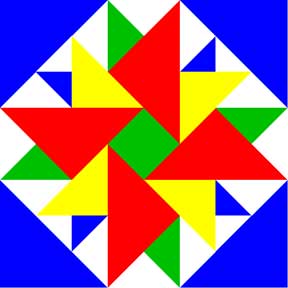
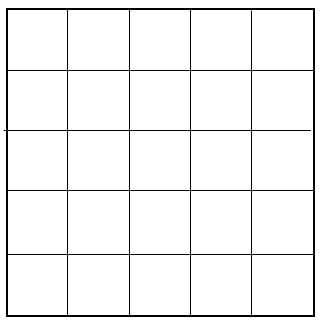
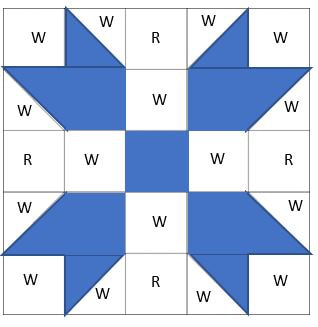
- Count the number of squares across and down to determine the quilt block grid pattern. (Figure 2)
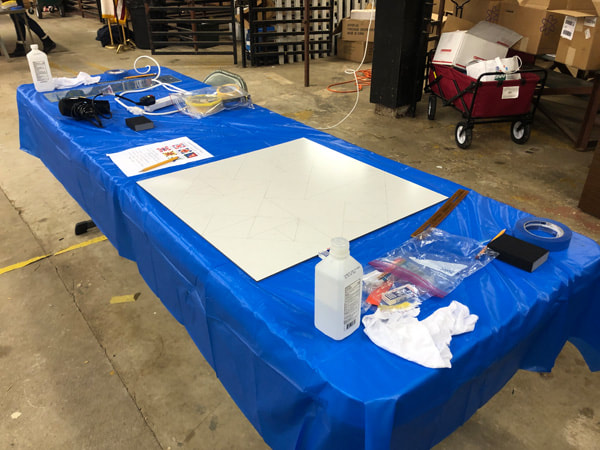
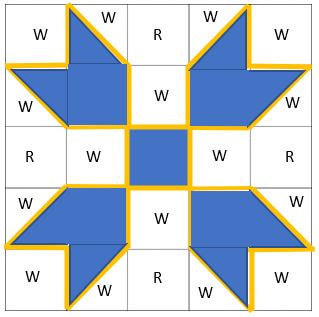
- Draw the grid pattern on your composite sheet with light pencil marks. (Figure 3)
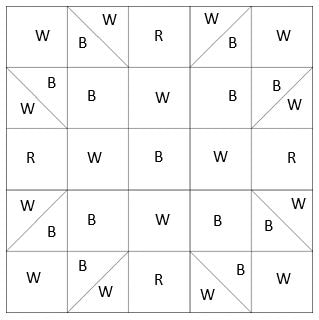
- Draw your pattern in each grid and label its color. (Figure 4)
PAINT THE QUILT BLOCK
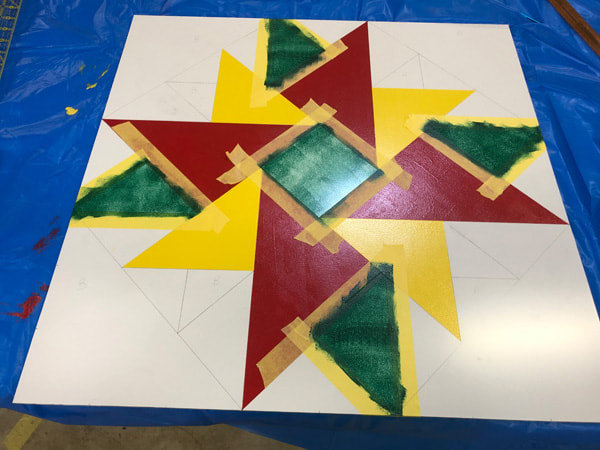
- Tape off one colored section at a time with Frog tape, pressing the tape firmly to seal the edges. (Figure 5)
- Apply a thin coat of paint to the first color using a small paint roller. (Figure 6)
- Repeat step 2 to apply 3-4 coats of paint until well covered.
Note: To reduce drying time use a blow dryer on low temperature. - While the last coat of paint is still wet, carefully peel off the Frog tape by pulling it back on itself at a 45-degree angle toward the section that was just painted. (Figure 7).
- Repeat steps 1-6 for each color to finish the quilt block and touch up any paint errors (Figure 8).
INSTALLATION
The Chatt Hills Barn Quilt committee will coordinate the installation of barn quilts on its trails. For installations on taller structures, the committee will work with the City to obtain an installation contractor.
For individuals desiring to do their own installations, the following advice is provided:
MATERIALS
For a list of materials, download the "Creating a Barn Quilt Guide."
The Chatt Hills Barn Quilt committee will coordinate the installation of barn quilts on its trails. For installations on taller structures, the committee will work with the City to obtain an installation contractor.
For individuals desiring to do their own installations, the following advice is provided:
- Select the appropriate equipment:
- For barn quilt sizes up to 4x4, installations may be done with a ladder
- For larger barn quilts, a scissor lift or bucket truck may be needed.
- Select the appropriate fasteners:
- On smooth surfaces, the barn quilt may be installed directly to the surface with the recommended exterior screws.
- On uneven surfaces such as those that have siding or barn board, wood strips may need to be installed to the surface first with exterior screws, and then the barn quilt would be screwed to the strips.
Note: Care should be taken not to “over tighten” the screws, as this will cause the Aluminum Composite Sheet to bend.
- The last step is to take a photo of the barn quilt with the host and the barn quilt painter.
MATERIALS
For a list of materials, download the "Creating a Barn Quilt Guide."
BARN QUILT SIGN BOARD SUPPLIER
G GLANTZ [Link]
430 Satellite Blvd NW #104
Suwanee, GA 30024
Phone: (866) 645-2689
Composite Aluminum Panels (4x8) [Link]
3MM 48" X 96" WHITE 2 SIDED BEBOND PREMI.
Glantz Code: EMPB31L
Cost: $59/Sheet (delivery is @ $7)
Aluminium composite cladding panels feature a composite core (often made of polyethylene) between two thin layers of aluminium. This is the preferred material for the Chatt Hills Barn Quilt Trail because of its durability and light weight.
====
MDO Board (4x8) [Link]
1/2" 48" X 96" 2 SIDED P/P PRIMED MDO
Glantz Code: EMP52
Cost: $80.36/Sheet (delivery is @ $7
Medium density overlay panel or MDO panel, is a paintable surface made of plywood with a weather-resistant resin overlay bonded to the wood by heat and pressure.
